
Instructions: Standard Plan Review - Temporary Structure
Background
In April 2019, the city council adopted an ordinance creating the 2019 Chicago Construction Codes. Unlike the pre-2019 Chicago Building Code, the Chicago Construction Codes are aligned with the widely adopted model building codes (I-Codes) published by the International Code Council, resulting in some significant changes in terminology. The 2019 Chicago Building Code (Title 14B) and 2019 Chicago Building Rehabilitation Code (Title 14R) became optional for most project types on December 1, 2019, and mandatory for all permit applications started on or after August 1, 2020 (with limited exceptions).
The City of Chicago is currently in the process of upgrading its online building permit interface (the Hansen Dynamic Portal). Unfortunately, the new system was not ready to launch at the same time as the new Chicago Construction Codes. These interim instructions will guide you through the steps needed to begin a building permit application using the Hansen Dynamic Portal, which does not currently reflect the terminology used in the 2019 Chicago Construction Codes, until that system is replaced.
By following these instructions, you will avoid unnecessary data entry on your part and help city staff to review and process your permit application more efficiently.
Thank you for your patience and cooperation during this transitional period.
These Instructions
These instructions were written specifically for the following type of building permit application:
Scope of Work: Temporary Structure (Special Construction) (installed at same location for 180 days or less)
Review Program: Standard Plan Review
Separate instructions are available on the Department of Buildings website if the scope of work is a permanent building or if you are using the Self-Certification Permit Program. Please use the appropriate instructions for your application type to avoid mistakes and extra work.
The Dynamic Portal (Hansen) and PDF Building Permit Application (Form 400)
To start a new building permit application, go to the Dynamic Portal (http://ipiweb.cityofchicago.org/DynamicPortal/) and log in using your unique account. (If you do not have an account, follow the instructions on that page to create one.)
To start this type of permit application, you must be an Illinois-licensed architect or structural engineer or a city-licensed expediter, and your license must be associated with your user account.
Once you have logged in to the Dynamic Portal, on the main page click “Apply for a permit.”
Several pieces of information that you will be required to provide in the Dynamic Portal portion of the application process will also be required when you fill out the PDF Building Permit Application (Form 400) during a later step of the permit application process. Form 400 reflects the new terminology and requirements of the 2019 Chicago Construction Codes.
It may be helpful if you begin filling out Form 400 before you log in to the Dynamic Portal.
It is your responsibility to make sure the information you provide in the Dynamic Portal matches the information you provide later when you upload a copy of Form 400. Inconsistencies between the two will delay issuance of your permit.
All permit-related forms, including Form 400, are available at: https://www.chicago.gov/city/en/depts/bldgs/supp_info/permitforms.html
Note: Many of these duplicate steps will be eliminated when the City’s new permitting system comes online. We appreciate your patience in the interim.
Begin the Online Permit Application
The Dynamic Portal will guide you through several pages to gather basic information about your permit application. As noted above, some of this information must match the information you provide on the PDF Building Permit Application (Form 400) later in the process, so it may be helpful if you begin filling out Form 400 before you log in to the Dynamic Portal.
Note: Many options in the Dynamic Portal are tied to your license type. If you do not see the options described in these instructions, your account may not be configured correctly, or your license may be expired. Please contact eplan@cityofchicago.org for assistance. When requesting assistance with the Dynamic Portal, it is helpful if you include screenshots of the problem you are encountering.
Job Type
Select “New Construction with Plans” as the permit application type.
In the “Workbenches” section, select “Tent/Canopy/Stage/Platform” only. Do not select any other choices.
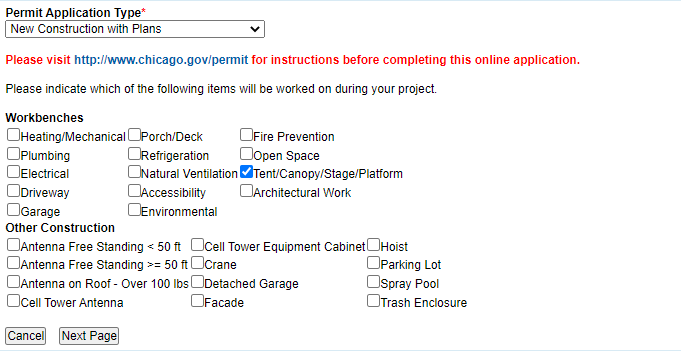
Click “Next Page.”
Job Location
Enter the address where the temporary structure will be installed.
If the temporary structure will be erected on a public street or sidewalk, provide the address of the nearest building. (You will also need to obtain a public way use permit from the Department of Business Affairs and Consumer Protection (BACP) and/or special events permit from the Department of Cultural Affairs and Special Events (DCASE)).
If the temporary structure will be erected in a park, use the park’s official address. For Lincoln Park and Grant Park, provide the address of the nearest building in the park, such as a fieldhouse or museum. (Addresses are available on the Chicago Park District web site.)
You may provide partial address information.
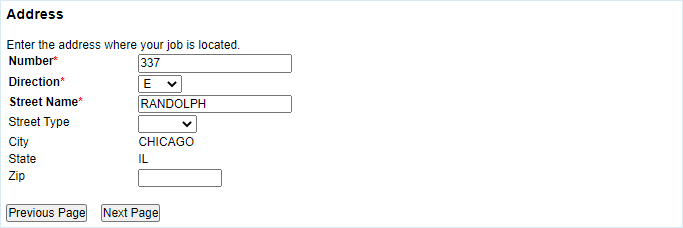
Click “Next Page.”
Address List
The system will attempt to validate the address you provide against the City’s address records. If the system identifies multiple possible addresses, please select the correct address from the list.
If the address cannot be validated (for example, because the address is on a newly-created street), you may continue with the process to obtain an application number, but you will need to contact the Department of Buildings via eplan@cityofchicago.org (attach a copy of your CDOT house number certificate) and a Department of Buildings employee will need to set up the new address before you will be able to pay the building permit deposit fee.
Do not pick an incorrect address that is “close enough.” It is very difficult to change the address after you start a permit application by paying the deposit fee, and this could delay processing of your permit application or require you to forfeit your deposit fee.
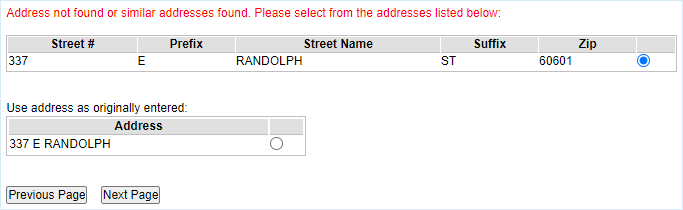
Click “Next Page.”
Job Description
For “Type of Permit” select “Commercial Construction,” even if your project involves a different type of occupancy.
For “Estimated Cost” provide the estimated cost of materials and labor for work to be performed under this permit.
For “Description of the construction/proposed job” see the detailed instructions and examples provided.
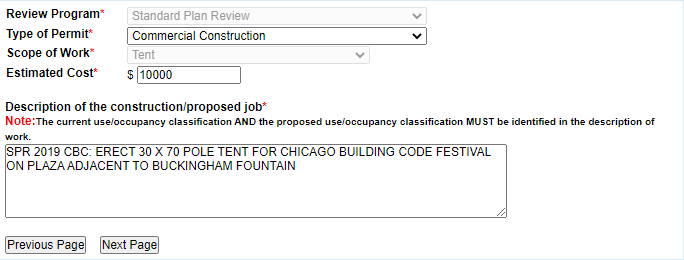
Click “Next Page.”
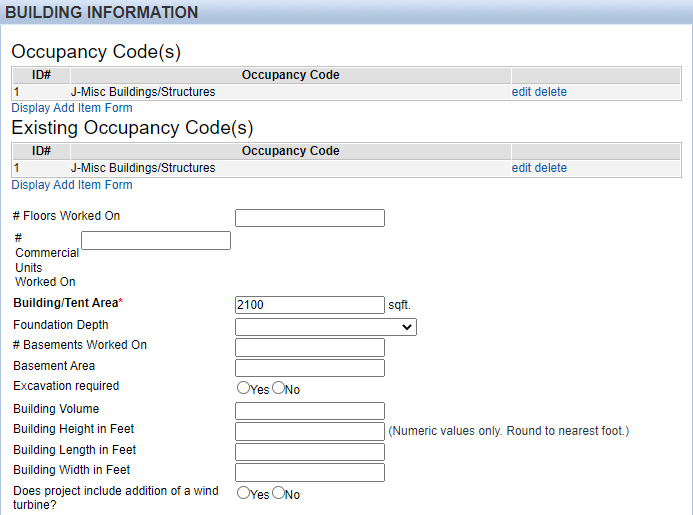
Application Detail: Building Information
For “Occupancy Code,” click “Display Add Item Form” and select “J-Misc Buildings/Structures” regardless of the actual occupancy. Click “Save.”
For “Existing Occupancy Code,” click “Display Add Item Form” and select “J-Misc Buildings/Structures” regardless of the actual occupancy. Click “Save.”
For “Building/Tent Area” enter the area of work, in square feet, calculated in accordance with Section 14A-4-412.2.2.1 of the Chicago Construction Codes Administrative Provisions:
“A = The total building area plus the gross floor area of a basement otherwise excluded from building area within the scope of work to permitted, in square feet.”
For “Building Height in Feet” enter the building height measured in accordance with Section 14B2-203.3 of the 2019 Chicago Building Code, rounded to the nearest whole foot. (Note: this will usually be different than the building height measured for zoning purposes.)
Leave all other fields in the “Building Information” section blank.
Application Detail: Tent
Provide the date that the tent or other temporary structure will be installed and the date it will be removed by:

For most temporary structures, installation is limited to 180 days without written pre-approval from the Department of Buildings, however the system will accept any range of dates.
Temporary structure applications must be started, and drawings uploaded at least 14 days before the erection start date to allow adequate time for processing and review. If not, a penalty fee will apply, and the Department does not guarantee the application will be reviewed before that date. When documents are uploaded on a weekend, city holiday, or after 4:30 p.m. on a day the city is open for business, the documents are considered received at the start of the next day when the city is open for business.
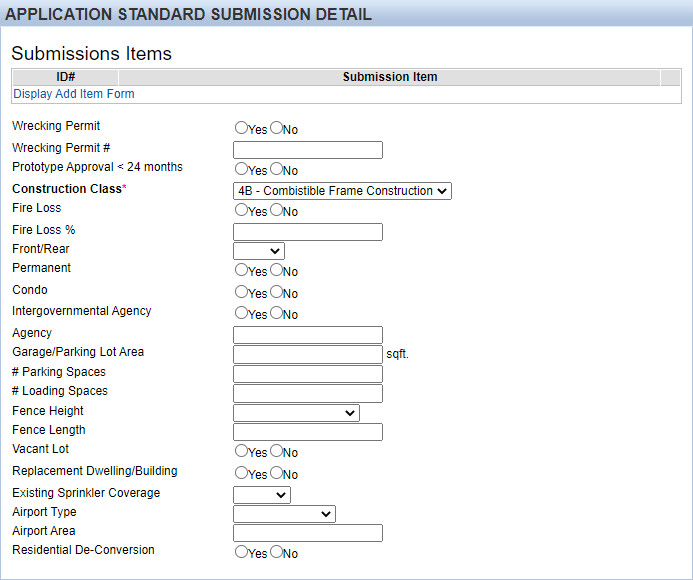
Application Detail: Standard Submission Detail
For “Construction Class” select “4B – Combistible Frame Construction” regardless of the actual construction type.
Leave all other fields in the “Application Standard Submission Detail” section blank.
Application Detail: Zoning Information
Because zoning review is not required for temporary structures, you may place an “x” in each required field.
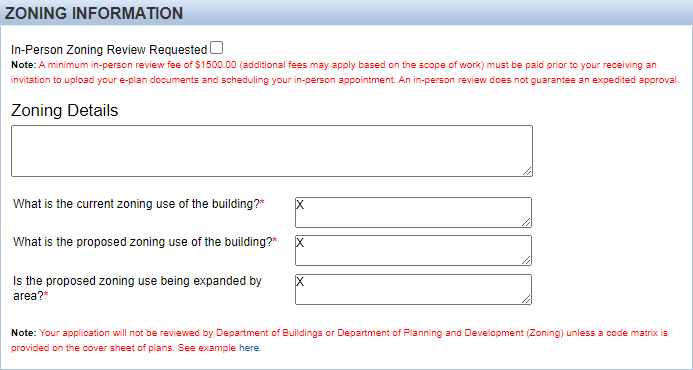
Note: After completing the required fields on this page, you may save your application and return to it later. If you wish to do this, click “Save Application.”
To continue with the application, click “Next Page.”
Contractors and Contacts
On this page, you will be required to provide information about the permit applicant, property owner, design professional of record, and expediter (if applicable) as well as the general contractor who will install the tent or temporary structure.
The system will use your credentials to identify your association with the permit application, either as an “Architect” or “Expediter.” This will be displayed on the initial page.
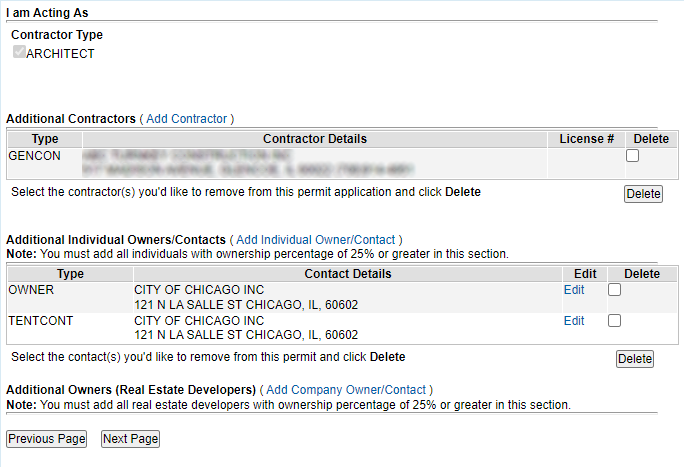
Contractors and Contacts: Add Contractor
Click “Add Contractor” in the first section to add the design professional of record, any permit expediter involved in the project, and the general contractor who will install the tent or temporary structure.
On the page which appears, you will be able to search for licensed individuals and entities either by name or license number.
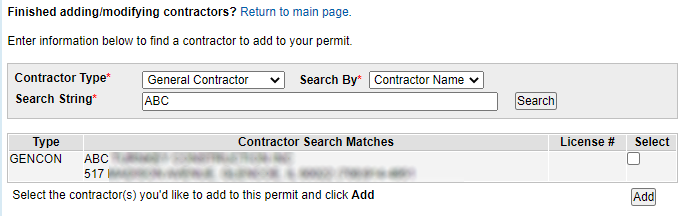
Mark the checkbox in the column labeled “Select” and then click “Add.”
Continue this process until you have added all contractors, then click “Return to main page.”
Contractors and Contacts: Add Owners/Contacts
Click “Add Individual Owner/Contact” in the second section to add the permit applicant.
You must indicate that the permit applicant is both the “Owner” and the “Tent Contractor.” (The General Contractor, entered in the previous section, will be responsible for installing the tent, and the project manager will not issue the permit unless a general contractor is provided.)
If the permit applicant is a corporation, company, or similar entity, enter the first part of the name in the “First Name” field and the second part of the name in the “Last Name” field. (See example.)
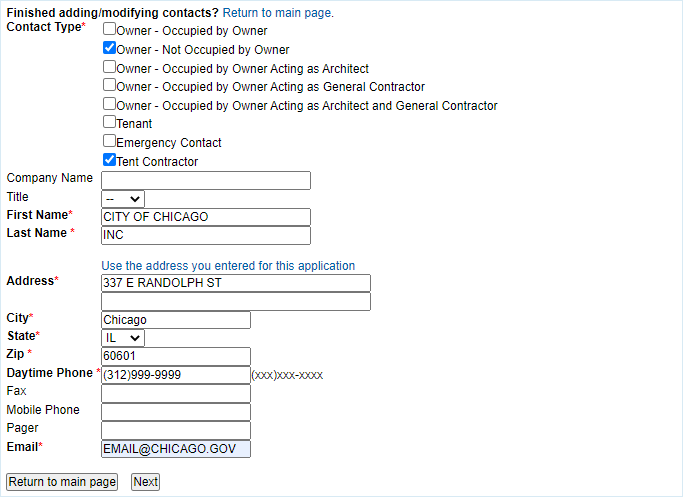
If the contact information that you enter appears to match a record that already exists in the system, the system will ask you to confirm if the contact is the same.
When you have finished entering all contacts, click “Return to main page.”
Contractors and Contacts: Add Company Owner/Contact
Do not use this section for temporary structure permits.
Certification
On this page, review and accept the statements and agreements:
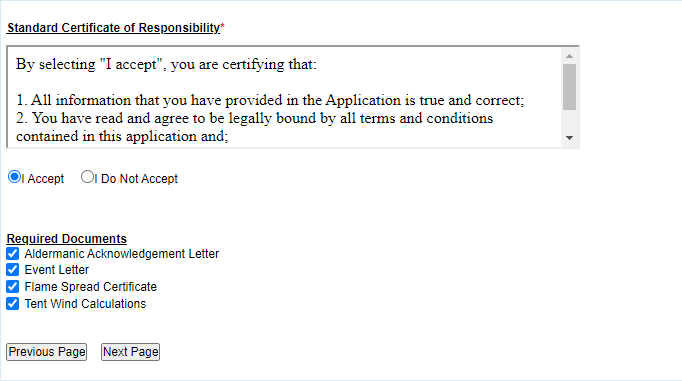
As of July 1, 2019, an “aldermanic acknowledgment letter” is no longer required and applications are no longer subject to a 10-day waiting period, however you must check the box.
Check the boxes for “Event Letter,” “Flame Spread Certificate,” and “Tent Wind Calculations” even if they do not apply to the type of temporary structure being permitted under this application.
Click “Next Page.”
Application Summary
Review the summary of information to verify that it is correct and complete.
You may click either “Previous Page” or “return to the beginning of the application process” if you need to change any of the data you entered.
The following information must match the information you provide on the PDF Building Permit Application (Form 400) which will be uploaded to ProjectDox:
- “Job Location” must match “Address” (Form 400, Page 1).
- “Estimated Cost” must match “Estimated cost of work” (Form 400, Page 1).
- “Description” must match “Description of work” (Form 400, Page 1).
- “Building/Tent Area” must match “Area of work” (Form 400, page 1).
- "Erection Starts" must match "Installation start date" (Form 400, Page 3-SC)
- "Removed by" must match "Removed by date" (Form 400, Page 4-SC)
- “Building Height in Feet” must match “Proposed Building Height” (Form 400, Page 3-NC).
- Under “Contractors” the “Design Professional of Record” (Form 400, Page 6-DP), "General Contractor" (Form 400, Pages 5 and 6-GC) and “Expediter” (Page 6-EX), if applicable, must be listed.
- Under “Contacts” the “Permit Applicant” (Page 5) and “Emergency Contact” (Page 5) must be listed as "OWNER" and "TENTCONT."
If you have not already started filling out a copy of the PDF Building Permit Application (Form 400), you should copy the information above to Form 400 before completing this step.
Click “Finish” if the information on the summary page is correct and complete.
Warning: You will not be able to make changes to the application data after you click “Finish.”
Pay Initial Fees to Start Your Application
Status
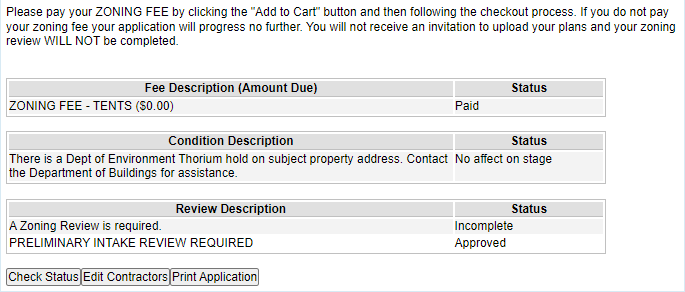
On the “Status” page, you will see that a zoning fee has been added to your application. You must pay this fee to “start” the application.
Click the “Add to Cart” button to add all unpaid fees to your cart.
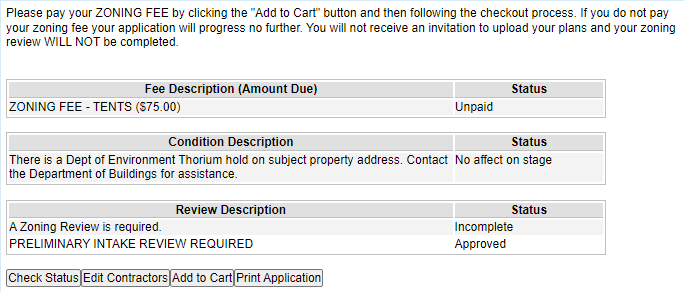
Click “View Cart/Checkout” in the panel on the left side of the page to pay the fees.
Cart / Checkout
Click “Check Out” to be taken to the City of Chicago’s eCheckout system where you will be asked to pay for all items in your cart.
If there are fees in your cart that you do not want to pay for yet, click “Remove” before clicking “Check Out.” You will be able to return fees to your cart from the Status page.
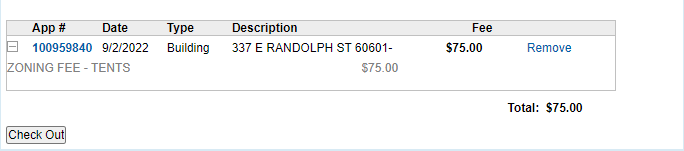
After successfully completing payment using the eCheckout system, you will be returned to the Status Page, where you will be able to confirm that the fees have been paid.
Status Page
As your permit application is being reviewed, you may return to this page to change the General Contractor who will be installing the temporary structure. You must provide complete contractor information before the permit can be issued by the project manager.
Continue Your Application Using ProjectDox
Invitation to Upload
Within one hour of your zoning fee payment being processed, you will receive an email inviting you to continue the permit application process using the ProjectDox system. You may also directly access the City of Chicago’s ProjectDox system at http://planreview.cityofchicago.org/
Please contact eplan@cityofchicago.org for assistance if you do not receive an invitation or cannot see a record for your application number in ProjectDox after an hour. Include the application number in your email.
Upload Drawings and Documents
To continue the application process, you must upload drawings and other documents, including a completed version of the PDF Building Permit Application (Form 400), using the ProjectDox system. Once you indicate that these documents are ready for review by completing the “applicant upload task,” city employees will examine your application for compliance with code requirements.
For more information about the City of Chicago’s E-Plan process and ProjectDox, including a User Guide, please visit: https://www.chicago.gov/city/en/depts/bldgs/provdrs/e_plan.html.
When Your Permit is Ready
When your permit application has been approved and your permit is ready to issue, you will receive an email notification. You will be able to pay the balance of your permit fee either through the Hansen Dynamic Portal or at a Department of Finance in-person cashiering location. (If you are paying at an in-person location, make sure you know the 9-digit application number.) After you have paid the fee, you will be able to print a permit certificate from the Dynamic Portal (or, if you pay in person, receive one from the cashier). You will also be able to download approved copies of your construction drawings from the ProjectDox system.
Before Installation Begins
A copy of the permit certificate must be posted at the site and in a location visible from a public street or sidewalk before any work begins. A copy (either paper or electronic) of the approved construction drawings, downloaded from ProjectDox, must be on site at any time when work is occurring.
A copy of the permit certificate must remain posted and visible at the site until the temporary structure is removed.
More Information
For more information about further steps in the process, including permit-related inspections, please visit http://www.chicago.gov/buildings.
If you need technical assistance with the Dynamic Portal or ProjectDox, please contact eplan@cityofchicago.org.